Perhaps you've used the RAM player and thought 'jeez - I wish I could see all of both video clips!' Or maybe you've simply been wondering what two video clips look like playing side by side. Either way - this is the script you've been looking for!
Script
ClipCompare
By Roger Hyde · 2006-10-21
- Version
- 0.3
- Version requirement
- 6; 5
- Date updated
- 2004-01-28
- Votes
- 6
- External download
- External download
Tags: Rendering
Description
Additional Info
Not long ago - a colleague of mine sent me two animation clips - and wanted me to critique them for hime - tell him which one had better timing. I played each one in turn - again and again - but they were so similar it made it difficult to really tell the difference*. 'Wouldn't it be useful if I had a video player that would let me view these at the same time - side-by-side?' I thought to myself. I tried Max's RAM Player - but it wasn't quite what I had in mind. A quick search on Google didn't turn up any such tools - so I figured - what the heck - I'll make my own! A few hundred lines of Visual Basic code - some MAXScript UI magic - and several strong cups of coffee later - ClipCompare was born.
View Interface Screenshot
The idea is pretty basic - you can load different clips into the left and right side and play them back in sync with each other. You can use the position slider to scrub through - adjust the Play rate slider to control playback speed - and set whether the clips will loop continuously or just play once. Buttons are provided to load the most recently rendered preview (assuming you haven't renamed it) and to remove a clip from the player. Easy peasy! So here's a brief little rundown of how I imagined ClipCompare being used:
Render a preview - and open up ClipCompare
Using the left 'P' button - load the preview into ClipCompare's left panel
Close ClipCompare (or leave it open if you wish)
Tweak your animation and render another preview
Open ClipCompare back up and load the preview - this time into the right panel
Play the clips and compare to see how well your changes are working
Repeat the process until you're done animating your scene!
ClipCompare - like many of my other scripts - is very easy to install. Just drag ClipCompare.mzp onto one of Max's viewports - and it'll bring up an install dialog. Hit the Install button - and there you go! Adding ClipCompare to your user interface is something you'll have to take care of yourself - though. Just open up Customize User Interface and find ClipCompare in the 'RHTools' category. It's up to you where you want to put the command - but I find it convenient to put it on the Animation menu just under 'Make Preview...'
NOTE: ClipCompare only works with AVI files - and is not tested with all possible codecs!
View Interface Screenshot
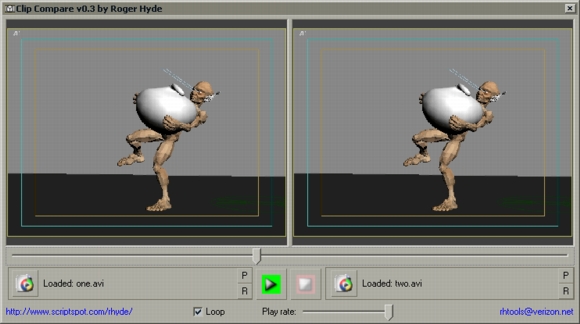
The idea is pretty basic - you can load different clips into the left and right side and play them back in sync with each other. You can use the position slider to scrub through - adjust the Play rate slider to control playback speed - and set whether the clips will loop continuously or just play once. Buttons are provided to load the most recently rendered preview (assuming you haven't renamed it) and to remove a clip from the player. Easy peasy! So here's a brief little rundown of how I imagined ClipCompare being used:
ClipCompare - like many of my other scripts - is very easy to install. Just drag ClipCompare.mzp onto one of Max's viewports - and it'll bring up an install dialog. Hit the Install button - and there you go! Adding ClipCompare to your user interface is something you'll have to take care of yourself - though. Just open up Customize User Interface and find ClipCompare in the 'RHTools' category. It's up to you where you want to put the command - but I find it convenient to put it on the Animation menu just under 'Make Preview...'
NOTE: ClipCompare only works with AVI files - and is not tested with all possible codecs!